Options Profile
In fact you have already met the options profile when opening the profile manager. This represents, however, only the profile of the registered Windows user if you have the appropriate rights.
In the Options profile, however, you can provide advanced definitions of options profiles and assign them to users later. A new profile is created through a right click on the profile list and then by clicking Add or by using the  toolbar button.
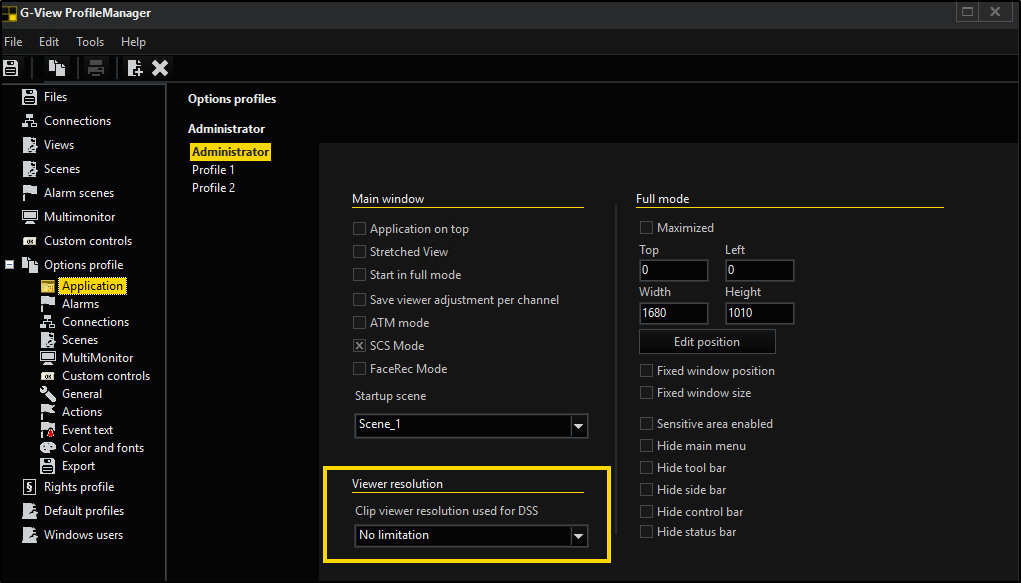
Under Application, user-dependent views and windows of G-View can be configured.
Main Window
|
Settings |
Description |
|---|---|
|
Application on top |
Use only on view stations without user interaction |
|
Stretched View |
Stretches the images of the viewers so that they are displayed as large as possible. |
|
Start in full mode |
Opens G-View with the settings defined under Full mode. |
|
Save viewer adjustment per channel |
|
|
ATM mode |
Automated teller machine mode |
|
SCS Mode |
Supply Chain Security |
|
FaceRec Mode |
|
Startup Scene specifies the scene that apply when the system first starts.
Viewer Resolution
In this section you can set a maximum viewer resolution for DSS.
Full Mode
By activating Maximized, G-View is opened in a maximally large window. Alternatively the size of the window and its position on the screen can be specified.
Starting from the upper left edge of the screen, the position of the window can be specified manually using Top and Left. The width and height of the window can be specified using Width and Height. The button Edit position can be used to adjust the size and position of the window that opens as a result. With a click on OK the adjustments are saved and applied.
Under Alarm settings for the presentation of alarms can be made. The settings for the alarm presentation are deactivated until the box of Process server alarms is ticked.
Presentation Mode
First you must choose a presentation mode. The following options are available:
- Present newest alarm
- Present newest alarm and confirm previous alarm
- Present newest alarm and remove previous alarm
- Keep presented alarm and queue newer ones
With Max alarms in queue you specify how many alarms will be shown maximally in the alarm message.
Alarm Priority Options
You will find the three known priority settings for alarms from G-Set under options: Red alarm, Orange alarm and Yellow alarm (in the sequence of high to low priority). You specify options for each of these alarm priorities.
Level selection
If you remove the alarm markings from the option fields of Process alarms of levels, you prevent the display of red, orange or yellow alarms.
Confirmation
Show notification dialog switches on a notification dialog when an alarm is raises and you have to decide whether to confirm or delete the alarm.
Presentation
|
Option |
Description |
|---|---|
|
Show alarm images |
The alarm images are switched through to the viewer. |
|
Bring to front on new alarm |
G-View is brought to front in the case of an alarm. |
|
Play sound on receiving new alarm |
An acoustic signal is produced by playing a WAV file when an alarm is raised. |
|
Clear viewer on remove alarm |
|
|
Restore prealarm state |
|
Queue management
|
Option |
|
|---|---|
|
Allow only one event instance |
|
|
Remove alarm after disconnect |
|
|
Save and restore on program start |
|
Remote Alarm Management
If the Remote control is activated by ticking the box Remote control under Options Profile -> Actions -> Receive viewer actions, the setting options are extended by the following options for Remote alarm management:
|
Option |
Description |
|---|---|
|
Send remote alarm management (RAM) notifications |
An alarm notification is sent to the remote connection |
|
RAM: Confirm local alarm on remote confirmation |
Local alarms are also confirmed for remote confirmation |
|
RAM: Remove local alarm on remote confirmation |
Local alarms are deleted with remote confirmation |
Alarm Sound
When alarm notifications occur alarm sounds can be played. For this purpose, a sound can be stored under Play special sound for alarm notification.
For occurring alarms in LiveMOS a sound can also be played. Store the sound under Play special sound on LiveMOS.
Possible video server and backup files connections are displayed under Connections. These can or can not be assigned to a profile by marking the connections check mark. With the selected profile only marked connections will be reachable in G-View.
In Scenes you can select the scenes that are to be assigned to the different profiles. The standard views are only displayed when the selection field Show standard matrix views is marked.
Under Multimonitor available windows can be assigned to the different profiles.
To do so, select a profile and additionally mark all windows in the displayed window list that are to be used with this profile.
Under Custom controls specific custom control can be assigned to a profile. Select a profile and mark all custom controls that are to be used with this profile.
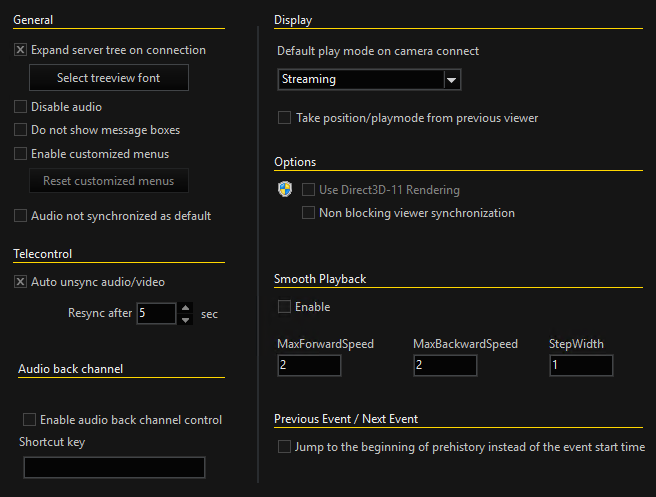
General
|
Settings |
Description |
|---|---|
|
Expand server tree on connection |
If Expand server tree on connection is marked, then a server's media channels will be displayed immediately on the video server list when a connection to a server is established.* |
|
Disable Audio |
Switches Audio off |
|
Enable customized menus |
Enable customized menus |
|
Audio not synchronized as default |
Audio not synchronized as a default |
* For many servers it is advisable to arrange for the display not to show the media channels, since otherwise the video server list can become very long and difficult to understand.
Telecontrol
With Auto unsync Audio/Video the audio and video of the viewer synchronizes automatically after a unsynchronization in a definable period of time.
Audio Back Channel
|
Settings |
Description |
|---|---|
|
Enable audio back channel control |
Enable audio back channel control |
|
Shortcut key |
Determine keyboard command |
Display
|
Settings |
Description |
|---|---|
|
Default play mode on camera connect |
You can choose here between streaming, the first image from the database, or the last image from the database. |
|
Take position/playmode from previous viewer |
Takes the position/playback mode from the previous viewer. |
Options
|
Settings |
Description |
|---|---|
|
Use Direct3D-11 Rendering |
Switching the renderer from DirectDraw to DirectX11. The Direct3D-11 Rendering setting is active by default. |
|
Non blocking viewer synchronization |
Switches to the date/time method for synchronized viewers during the search and thus enables a faster viewer response |
Smooth Playback
With the help of Smooth Playback, database images can be played forward and backward by clicking on the Play button one or more times in a quick motion.
|
Settings |
Description |
|---|---|
|
Max. Forward Speed |
setting for the maximum speed forward 1 stands for normal speed, 2 for twice as fast, 3 for three times as fast, etc. |
|
Max. Backward Speed |
setting for the maximum speed backward 1 stands for normal reverse speed, 2 for twice as fast, 3 for three times as fast, etc. |
|
Step Width |
integer increments (1,2,3, ...) |
Example The maximum forward speed was set to 2, the step width to 3. If the Play button is pressed in the viewer, the images from the database are played back normally. Clicking again doubles the speed (step 1), clicking again quadruples it (step 2) and clicking again changes playback speed to six times (step 3). Because only three steps were specified, the fourth click returns the system to the default setting (normal playback).
Note the following:
- Due to technical reasons, fast rewind can cause jerky pictures
- Switching to another playback mode will leave Smooth Playback
- No response about the actual playback speed takes place
- For the speed settings, decimal values such as 1.2 or 1.8 can also be entered.
Previous Event / Next Event
If the option Jump to the beginning of prehistory instead of the event start time is activated, the buttons First Event and Last event in the control bar (see Event, Motion Search (MOS) and Section) jump to the time points of the prehistory instead of the event. If you press the Ctrl key, the buttons jump to the event times as usual.
If this option is deactivated, you can move to the prehistory times instead of the event times by pressing the Ctrl key.
Receive Viewer Actions
Use the Actions dialog to establish some of the base settings for handling actions:
Receive viewer actions
|
Actions |
Description |
|---|---|
|
Remote control |
Accept viewer actions for the remote control of the program |
|
Viewer client number |
Number of the Viewer client for remote control |
Send Notification Actions
|
Actions |
Description |
||
|---|---|---|---|
|
Alarm queue
|
Send actions in case of alarm list changes, confirmations and deletion |
||
|
Image export
|
Send actions in case of export of pictures and sequences, when printing or copying to the clipboard |
||
|
Viewer status
|
|
Send actions when connecting or disconnecting the viewer or when changing the playing mode |
|
|
... to participating server |
Send to participating servers |
||
|
... as broadcast to all |
Send as broadcast to all |
||
If under Receive Viewer Actions you have activated the field Remote Control, the settings options under Alarm expand Remote alarm management.
Settings for fisheye dewarping (fisheye distortion correction)
In all viewers that are connected to a server, the camera movements are also controlled when fisheye dewarping is used, for example, when the connected MBEG actively controls the camera.
Because fisheye dewarping is a software feature that is or can also be applied retroactively to recorded client server data, these camera movements are not always desired by the remote control. With the help of the Ignore Remote PTZ switch, the remote control can be switched off.
Event text in viewer
For the selected profile, you need to establish which event text (name, description, data) should be displayed for the alarm in question.
Example In the example, alarm name, alarm message and the name, description and data of the event are displayed for all types of alarms.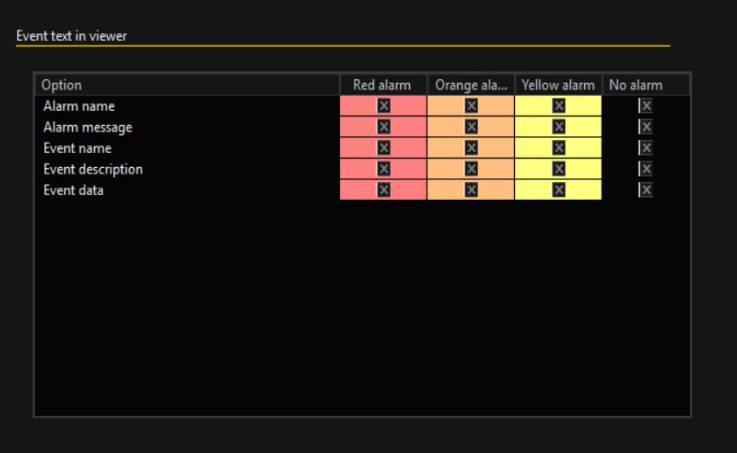
Font of event text
Configure the event text position. Choose between centered, left-aligned and right-aligned
Color and fonts specifies the appearance of the viewer's surroundings. Under the points Border of viewer, Background of viewer and Font of viewer color and font settings can be made for the viewers.

When selecting colors, they can choose between the suggested colors and custom colors. To select or add custom colors, select Custom.... In the dialog window you can select a color or define a new one clicking on Define custom colors...
Export path
To create a fixed export path add a specific path under Export path.
The path indicates where exports should be placed. The user will then only receive a file name suggestion, which can be changed.
The file extension, and thus the format, can be chosen from the given selection. The preselected file extension for single frame export can be specified. Environment variables are expanded. GBF or MPEG format cannot be assigned.
Example Thus an entry such as "C:\Test\*.jpg" saves all exports in the c:\Test directory and selects JPEG.
Trace export
Trace export is only available in SCS mode. SCS mode can be activated in Options profile -> Application -> Main window.
Image export
Use Export Privacy: As long as this option is not active, the images are exported from the database as they are saved in the database (normal or masked, depending on the presetting). If the option is activated, masking is performed when an export is carried out.
DVD writer
When creating Video DVDs, you need at least 10 GB of free hard drive space. If the available space on the system partition is not sufficient, you must specify an alternate path for temporary storage. You can enter this path here.
GBF export
Enable locked export: If this function is activated, when viewed in G-View, an exported GBF file cannot be saved again as a GBF file.
Irremovable privacy zones: If this function is enabled, the privacy zone is permanently burned into the image. If it is not enabled, the privacy zone is only hidden again using a software mechanism when the GBF file is reloaded into G-View.